Reducing Viral Load With A Simple Project
Everybody knows that we're working our way into what's turning out to be a slightly odd start to spring.
The sun is up earlier and goes down later. The birds are chirping outside of our window., The flowers are blooming, the lawns are greening up and we're all stuck inside.
Thanks quarantine!
I'm just kidding. We all.... well, most of us know this is for the greater good.
Let's talk about bringing the outdoors inside with a little project that can help reduce the transmission of viruses and bacteria.
Many of us are sitting inside, concerned that our hair has obviously gotten too long because we can't get it trimmed. We tap our overgrown fingernails on the table, staring outside, wishing we could go do things.
Some of us are lucky enough to have trail systems and parks near our houses where we can get outside and still keep our 6-ft distance.
Some of us enjoy our front and back yards as our little retreat away from the dreaded house where we have been trapped.
Like many of you who have to work from home on Zoom, you can escape to the backyard where pants are optional. It is. Going to the front yard, on the other hand, may require one to wear sweatpants or pajamas. which are a welcome form of acceptable clothing nowadays.
Let's talk about viral transmission and viral load. We obviously know that proximity to other people can aid in the spread of this wonderful pandemic.
Being stuck in an enclosed area, such as in stores shopping for that required food to keep us alive can make this so much worse.
We have masks to slow the dispersing of aerosolized biological fluid (mucus and saliva) from our nose and mouth as we exhale and speak. Masks do not filter the air.
Now we've got this mask over our face, while we're stuck inside, with this big mop of hair on our head, super long fingernails and no pants.
. Stale air being recirculated in your home is a breeding ground for microorganisms.
Nasty bacteria, viruses, fungi and mildew already exist in your house, regardless of your exposure to Covid-19. Some are airborne, some are surface dwellers (like the Covid-19 virus) and some release spores into the air.
Now we're sitting pantless, with super long hair, in our house filled with all sorts of disgusting microorganisms, only able to escape to the backyard or the front yard if you're willing to put on a pair of pajamas or sweatpants. We won't judge you. We get it. It's been a long year and it just started. Let's not forget if 2020 couldn't get worse, murder hornets are now a thing.
Since I got off topic a little bit, I digress. Back to viral load and transmission. Although we know this virus isn't exactly airborne, it can remain in the air for up to 8 minutes, depending on the micron size of the biological fluid. We also know that it takes a certain amount of virus or bacteria to get one sick. The reality is it takes a specific percentage depending on your genetics and personal health and hygiene to get one sick in most cases.
Hygiene isn't being practiced as often as it should be at this moment in time. Maybe we should be thinking about how to minimize getting sick from the nasty junk that's already inside of your house, even if you haven't brought this specific virus home.
What would help? Everybody thinks that wiping down surfaces with disinfecting wipes is going to do something. It might, however 98% of disinfecting products are used improperly. You're not actually disinfecting, you're simply sanitizing . You’re reducing, not eliminating, some of the bacteria and viruses on your surfaces.,
What would help? Well, we know that washing our hands for 20 seconds with soap is the best way to break down the oil based exterior of a virus and many bacteria. Once that envelope has been ruptured, the acids in the RNA begin to deteriorate rapidly, killing the virus and ripping its cells into oblivion.
Washing our hands for 20 seconds is more effective than wiping down surfaces with sanitizers or even putting hand sanitizers on your hands because the reality is you're not going to use them properly anyway. The microbes that still exist after you use your disinfectant wrong are going to grow all over and take the place of the few microbes you just wiped away.
Considering we've all learned our hygiene is not great and we can't stop touching our face while we're putting our pantless butt all over the place and touching everything in our house we're really just smearing all those microbes from one surface to the next.
Your best options are as follows:
Option 1: You can call us to do a disinfecting treatment on your entire house while you go out for a walk for a couple hours or sit in the park. Yes,! pants are required for this activity.
The next option is good for if you don't want us to do a treatment because you made friends with your microbes and you decided not to charge them rent or likely because you already spent that $50 for a basic professional disinfecting on using disinfecting products you used and continue to use incorrectly.
Option 2: Ventilation is your friend! The air outside is less likely to have densely packed microbes than the ones like the ones you can't properly kill or evict as they have taken up in your home
You should open your windows and doors! That should help break up the clusters of nasty things in your home, reducing the amount of viruses and bacteria. By increasing the total volume of air being exchanged in your home, the amount of microbes will decrease.
Let's face it, you should probably open your doors and windows anyways. You've been sitting in your house pantless and not taking a shower for far too long now.
For those of you who do have us (Renovair) treat your home, ventilation will help you maintain that disinfected home.
To recap:
If we (Renovair) do not treat your home, ventilation will reduce microbes in your home.
If we (Renovair) do treat your home, ventilation will help maintain the disinfection of your home.
Now, I'm sure you're thinking I'll just have someone do a deep clean, that should help.
WRONG! Ask your cleaning crew if they are certified for disinfecting COVID-19 in any way, shape, or form!
We at Renovair are certified. We hold certifications from the World Health Organization in the prevention and spread of COVID!
Now that we bragged a little let's move onto the project "if applicable".
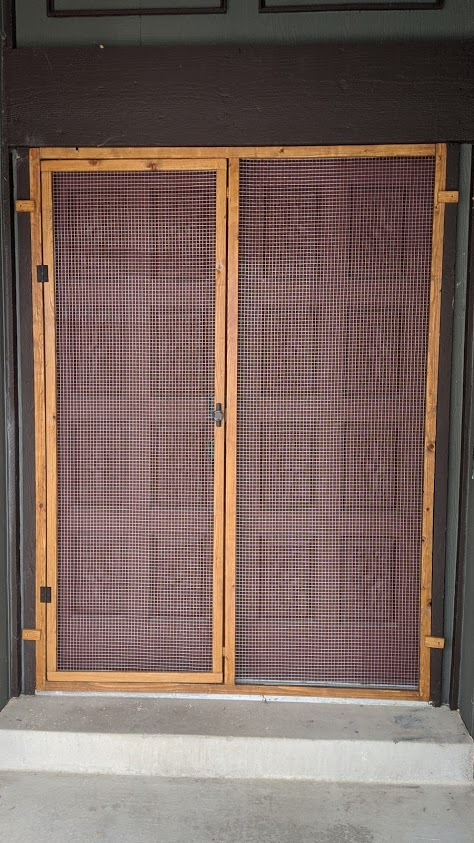
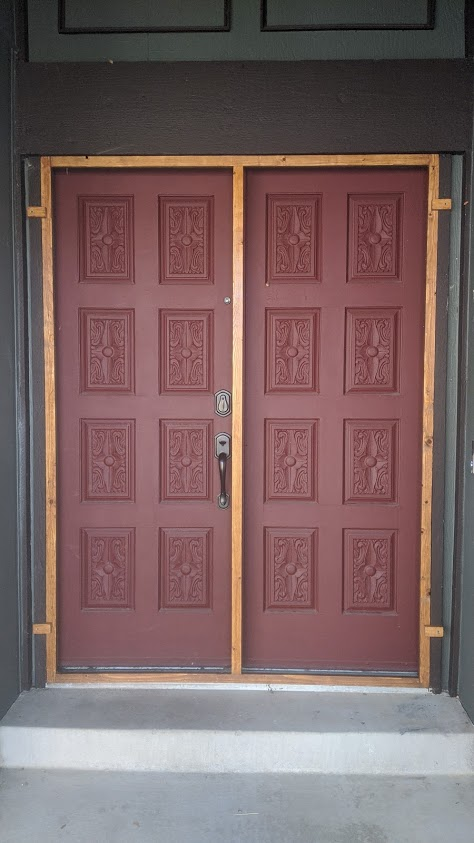
I've noticed many of you don't have a screen door. The largest single opening in your home is a door. It's great that you're able to open the back side.. Still, there is no substitute for a good cross breeze to get that nasty air out of your home, thereby reducing microbes in your home.
Screen doors can be expensive and not aesthetically pleasing.
I came up with an inexpensive solution you can modify in any way you so choose. A simple removable screen door that should get your pant-less stench out of that house and get the fresh air in while keeping your freeloading microbes at bay!
A word of caution: pants are not required for this project. We cannot guarantee what the neighbors will think, say or do if they are not worn.
Step 1: Gather
I went with inexpensive materials here as I'm sure you're not looking to make a mahogany or walnut screen door. If you are, well don't let me stop you!
I also wanted a wood that was easy to cut, requiring only hand tools to build and assemble the door. The project will require an inexpensive 1x2" furring strip.
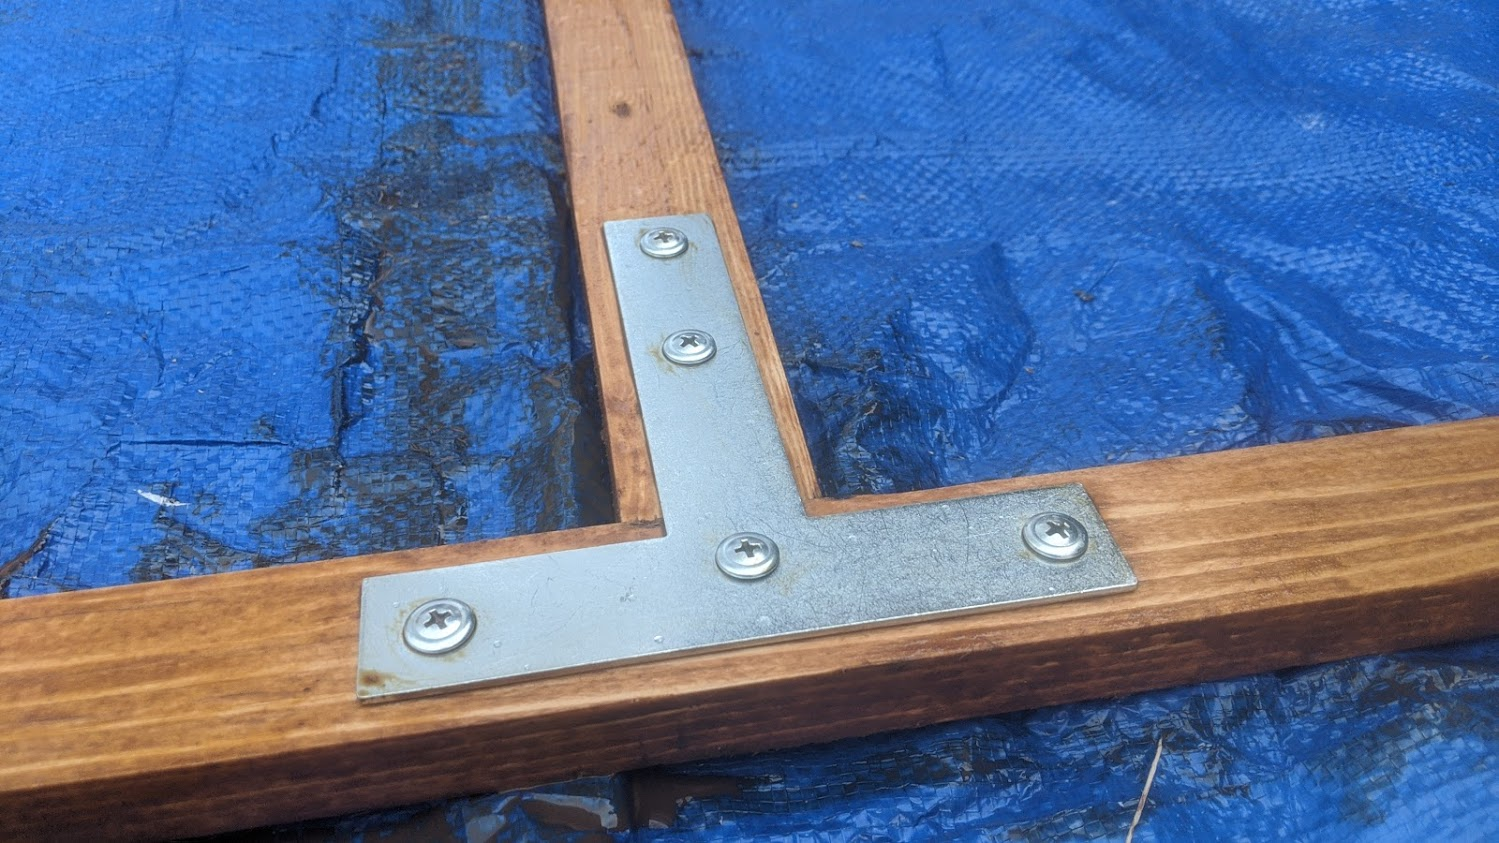
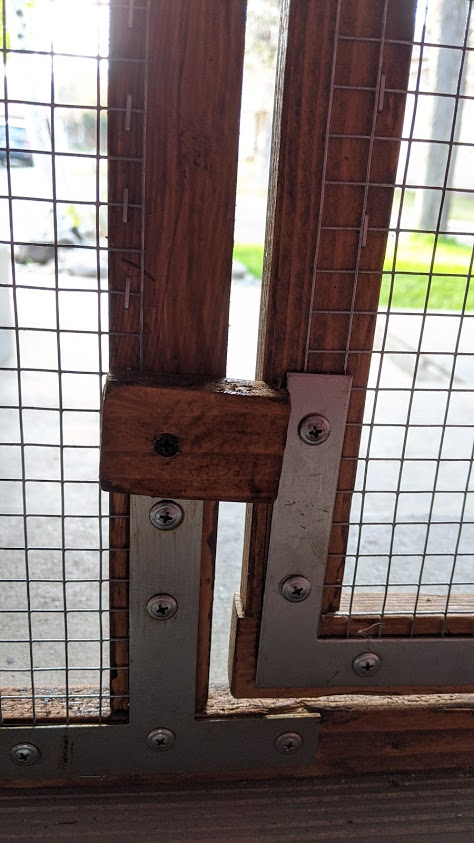
For the corners, feel free to use pocket screws if you have a jig. if not,angle brackets will work. just fine, which is what we used for simplicity!
Proper length screws are a requirement as well as your choice of screen material.
Pick a handle for your screen as well as whatever hinges suit your fancy.
Furring Strip : https://www.homedepot.com/p/1-in-x-2-in-x-8-ft-Furring-Strip-Board-160954/100009348
Flat Corner Brackets: https://www.homedepot.com/p/Everbilt-2-1-2-in-Zinc-Plated-Flat-Corner-Brace-4-Pack-15295/202034147
Screws: https://www.homedepot.com/p/Pro-Twist-8-x-3-4-in-Phillips-Pan-Head-Self-Drilling-Screws-1-lb-Pack-NMTD8341/301548797
Screen:
Option 1.) Expensive but nice hardware cloth https://www.homedepot.com/p/Everbilt-1-2-in-x-4-ft-x-25-ft-19-Gauge-Steel-Hardware-Cloth-308226EB/205960849
Option 2.) Standard screen https://www.homedepot.com/p/Phifer-48-in-x-25-ft-Charcoal-Fiberglass-Screen-3000041/100391412
Option 3.) Pet screen https://www.homedepot.com/p/Phifer-48-in-x-84-in-Black-Pet-Screen-3004153/100565927
Hinges: https://www.homedepot.com/p/Wright-Products-3-in-x-2-5-in-Steel-and-Black-Hinge-1-Pair-V35BL/204090798
Step 2: Measure!
I shouldn't have to tell you this. Though, as 2020 has surprised me more and more perhaps I do need to tell you this…Simply measure the Inside corner of your door frame where the frame will sit! Measure both sides, as well as top and bottom.
Step 3: Cut
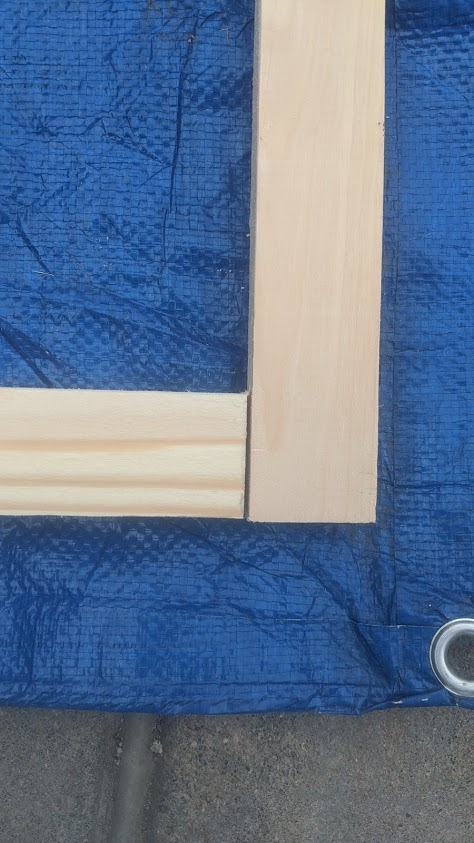
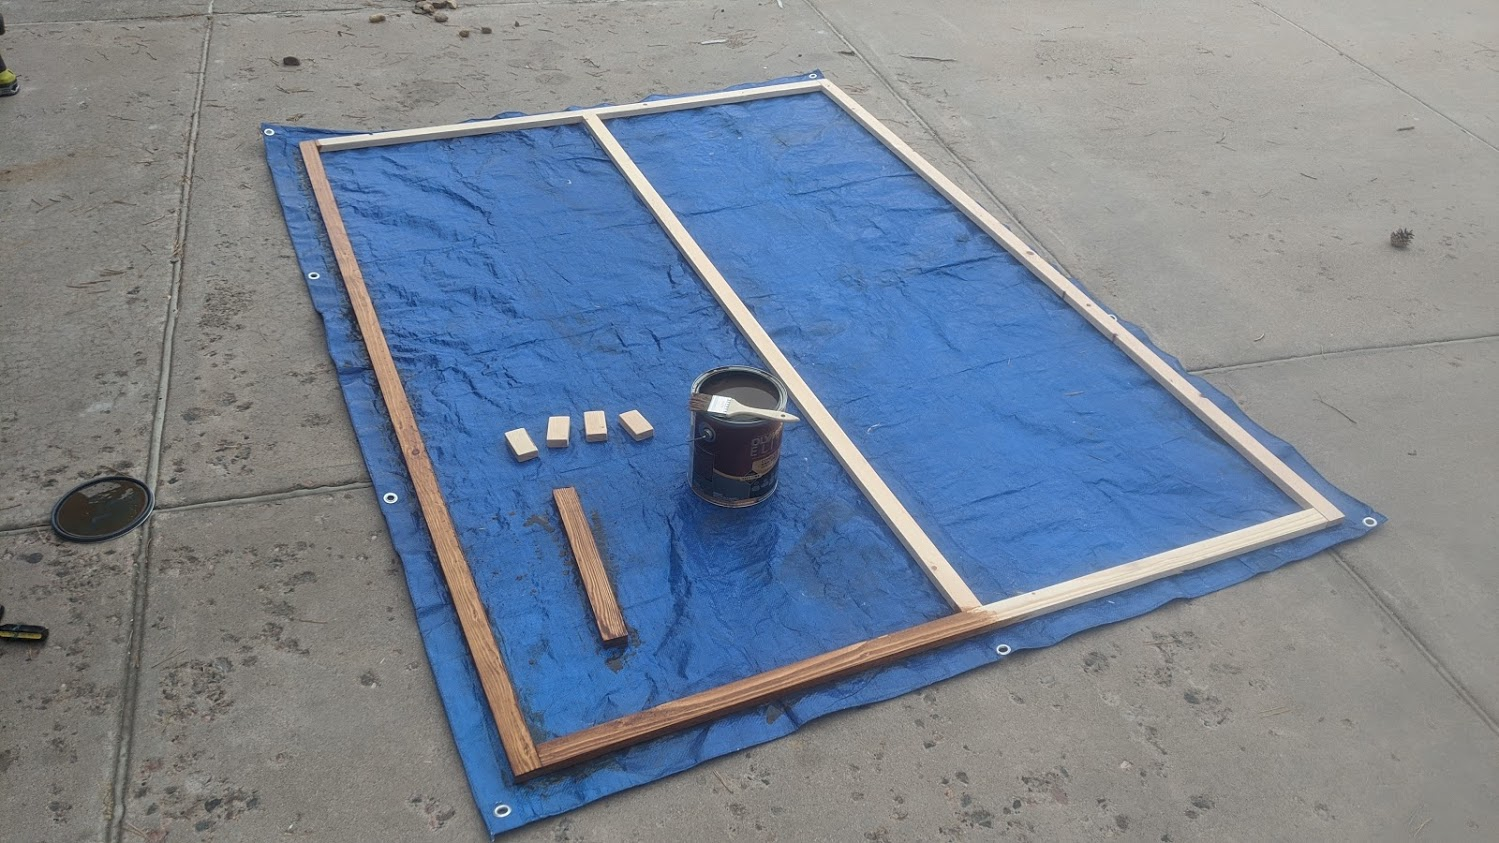
Not that we have our measurements, cut all of your pieces to length. If you are mitering the corners, make sure to correct for this measurement.. If you can’t make miter cuts feel free to do a shaker style butt joint as we did here for simplicity. Just make sure that you determine whether you want the sides or the top and bottom to overlap and cut the opposing edge accordingly to make room.
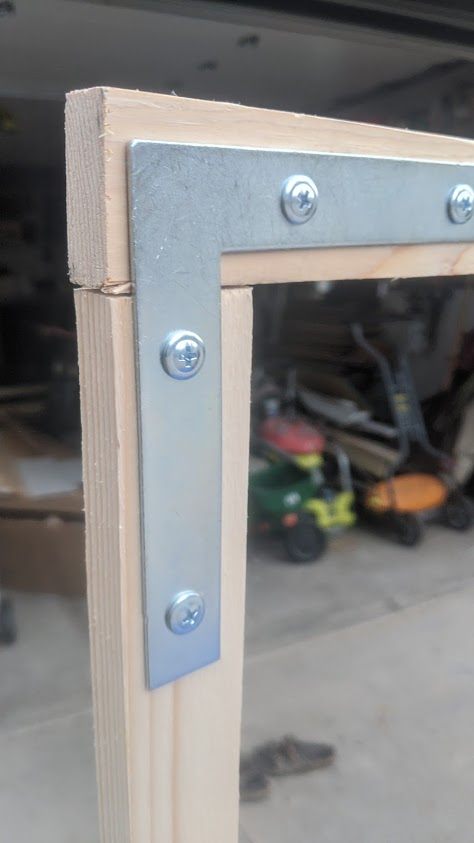
Step 4: Assemble
Again, we aren't using pocket screws for simplicity reasons.. Make sure that all the corners are square and screw in your corner brackets. If there are any knots or deep grains in your furring strips, I would suggest pre-drilling to make sure the wood doesn't split.
Step 5: Test fit
Now that we've got the frame all put it together, push it into your door frame. It should fit snugly but require a little bit of force to get it into place.
Now considering I have a french door, mine is going to be a little bit different. I've had to place a support in the center, both for stability as well as acting as a frame for the screen door. I also used a flat T bracket.

I stained mine early to beat the rain. See step 7 for sealant.
Step 6: Measure again
Now that you've got the frame installed, measure the inside edges and top and bottom of the new door frame you just built.
Subtract 1/8 from each side and 1/8 from top and bottom to ensure proper clearance around the door and the door frame.
Step 7: Cut again
Just like step three, assemble all of your pieces using angle brackets to ensure that all corners are square.
Step 6: Check fit
Check the fit of your new door, ensuring that you have proper clearance around all sides. That will make sure that the door swings open and closed with no resistance.
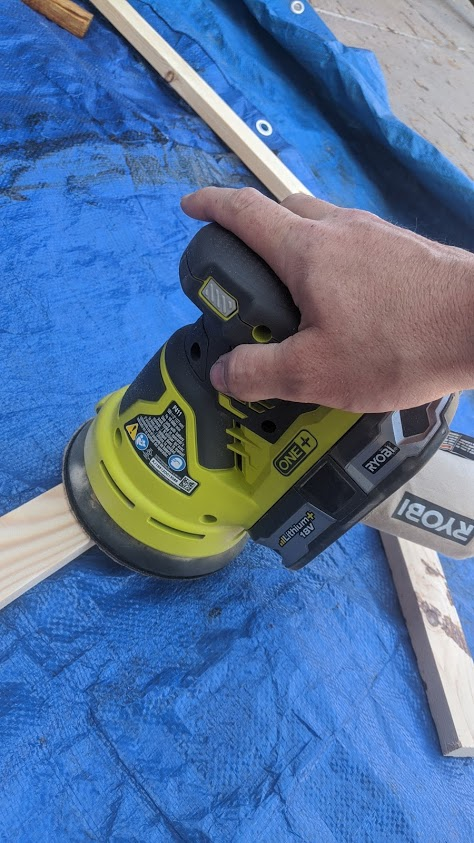
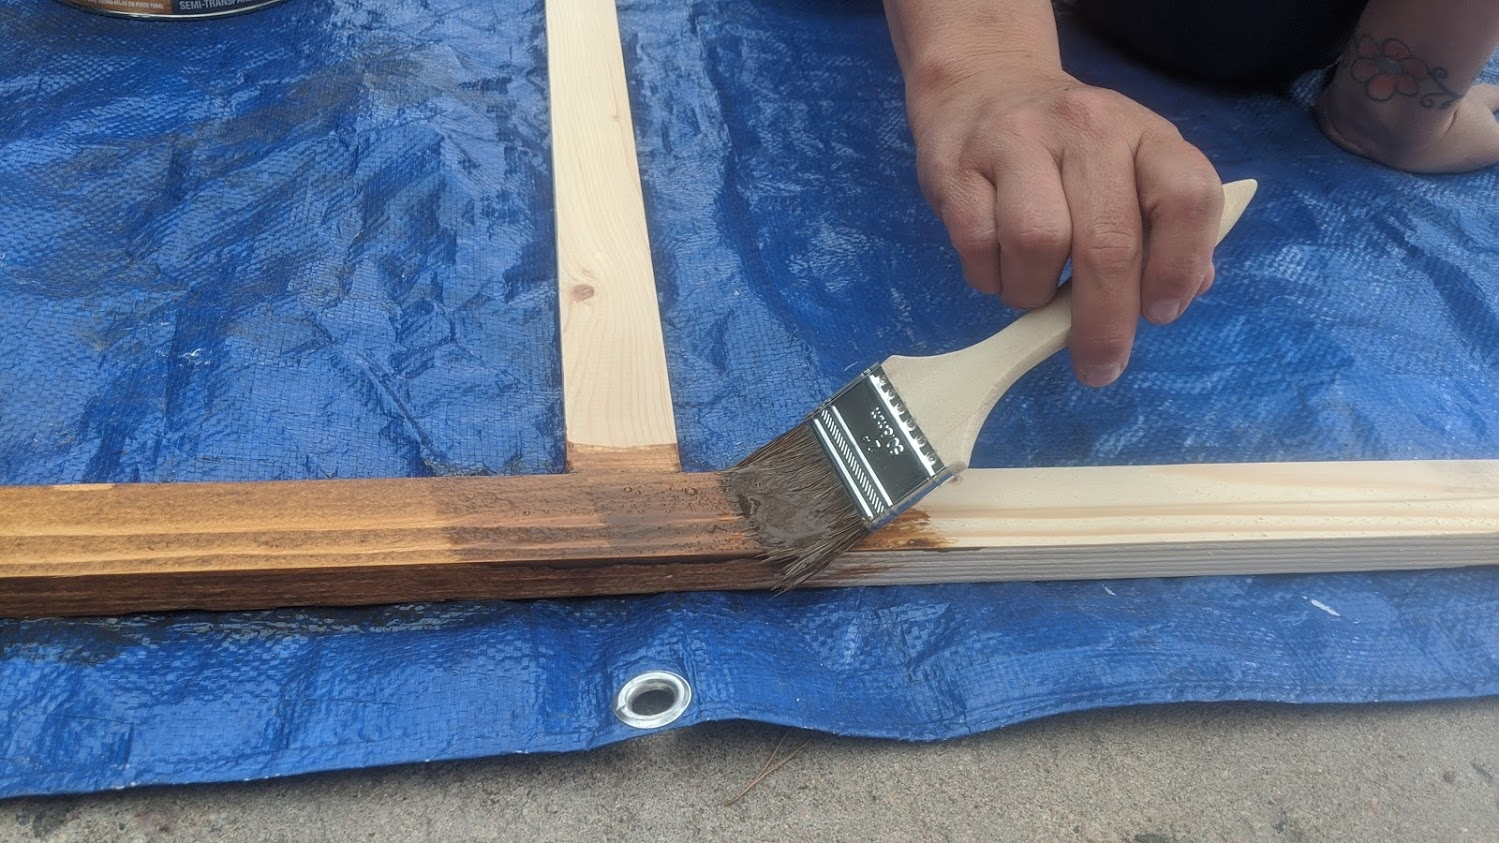
Step 8: Stain or something
Now that you know everything fits, now is a good time to quickly sand and stain the wood, paint it or protect it in some way.. We simply used some stain we had in the basement. Feel free to remove the brackets or like we did, just stain over them and wipe off the stain.
Step 9: Screen
You may want a friend for this step but considering quarantine it's not required.
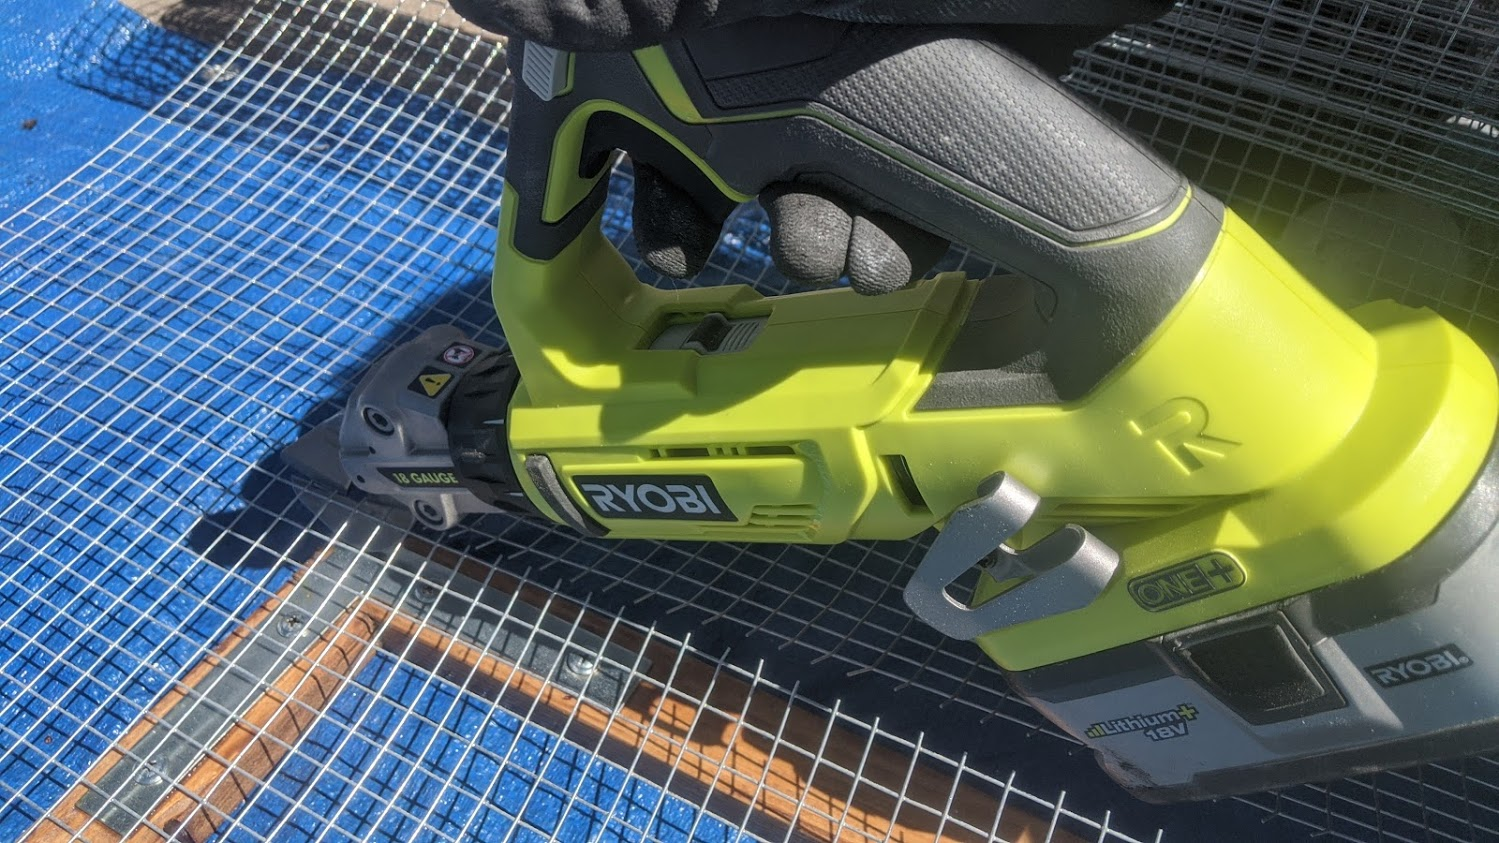
Depending on the screen you choose, you may find many ways to fasten it. We went with hardware cloth as we're not worried about bugs entering our home.. Also, we are more worried about the look and airflow. Keep in mind that different screen mesh sizes will create different resistance when it comes to air flow. Pick which one is best for you.
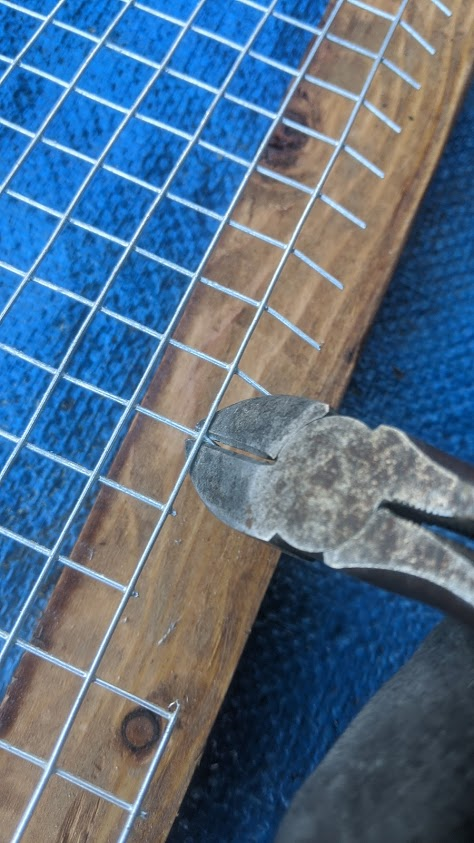
Cut your screen to length. Depending on the screen you choose you can use anything from a razor blade or scissors, up to needing shears or dykes to cut.
Now comes time to attach the screen to the frame. The best way for us to attach ours is simply with staples. You're likely going to find that this is the easiest way to attach your screen..
Place a staple every 1 to 3 inches down the length of the door. Staple the opposite side to prevent sag in the door. If using standard screen it may not be the worst idea in the world to slightly warp the door by propping both ends up on a scrap piece of 1x2-in furring strip and anchor the center down with clamps or rocks. This will ensure that when letting the door release back to standard size there is tension on the screen.
Now is the best time to staple the top and bottom as well again stapling every 1 to 3 in.

Step 10: Shim
This is best done with two people but one can still handle it If you don't mind using your head as a third hand.
At this point it's best to raise the door into place. Use folded pieces of paper, wood shims, cardboard or whatever else you find around your house andshim the door into place, ensuring a proper eighth inch gap around the door frame and the door.
Step 11: Hinges
Typically hinges come with screws. If not, get the screws that you use to put your door together for the angle brackets.
Measure where you would like the hinges to sit. We went with 12" from the top and bottom.
Make a quick pencil mark and place the hinge centered between the gap of the door and frame.
Use a pencil to make a mark of the location where the screws will go. Check for knots or odd grain in the wood. If either odd grain or knots are found, pre-drill the wood and screw in the screws.
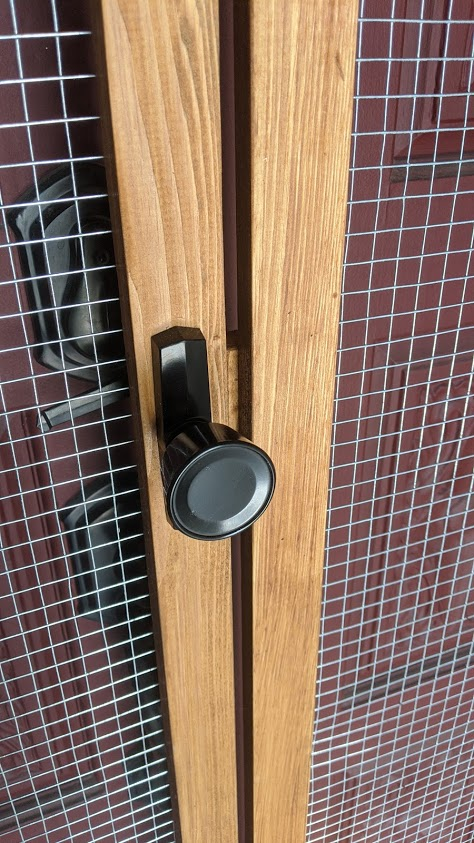
Step 12: Hardware
This is a great time to put on the door handle at the level that you so choose. Simply close your front door and choose the location that best suits your new screen door handle, ensuring it does not impede the existing front door handle.
Use the template that comes with the screen door hardware and follow the directions on the package to ensure proper location and hole size for the hardware that has been chosen.
Step 13: Stops
As of now you're wondering how the screen door is going to stay in place considering the frame isn't mounted to anything.
Well, here you go.
We wanted our screen door to not be a permanent fixture. It's likely going to come out during winter time and be stored because I'm not looking to have my front door open often when it's snowing outside or below freezing. We don’t want to spoil the look of our front door and don't want it getting destroyed by the elements considering this is just a furring strip.
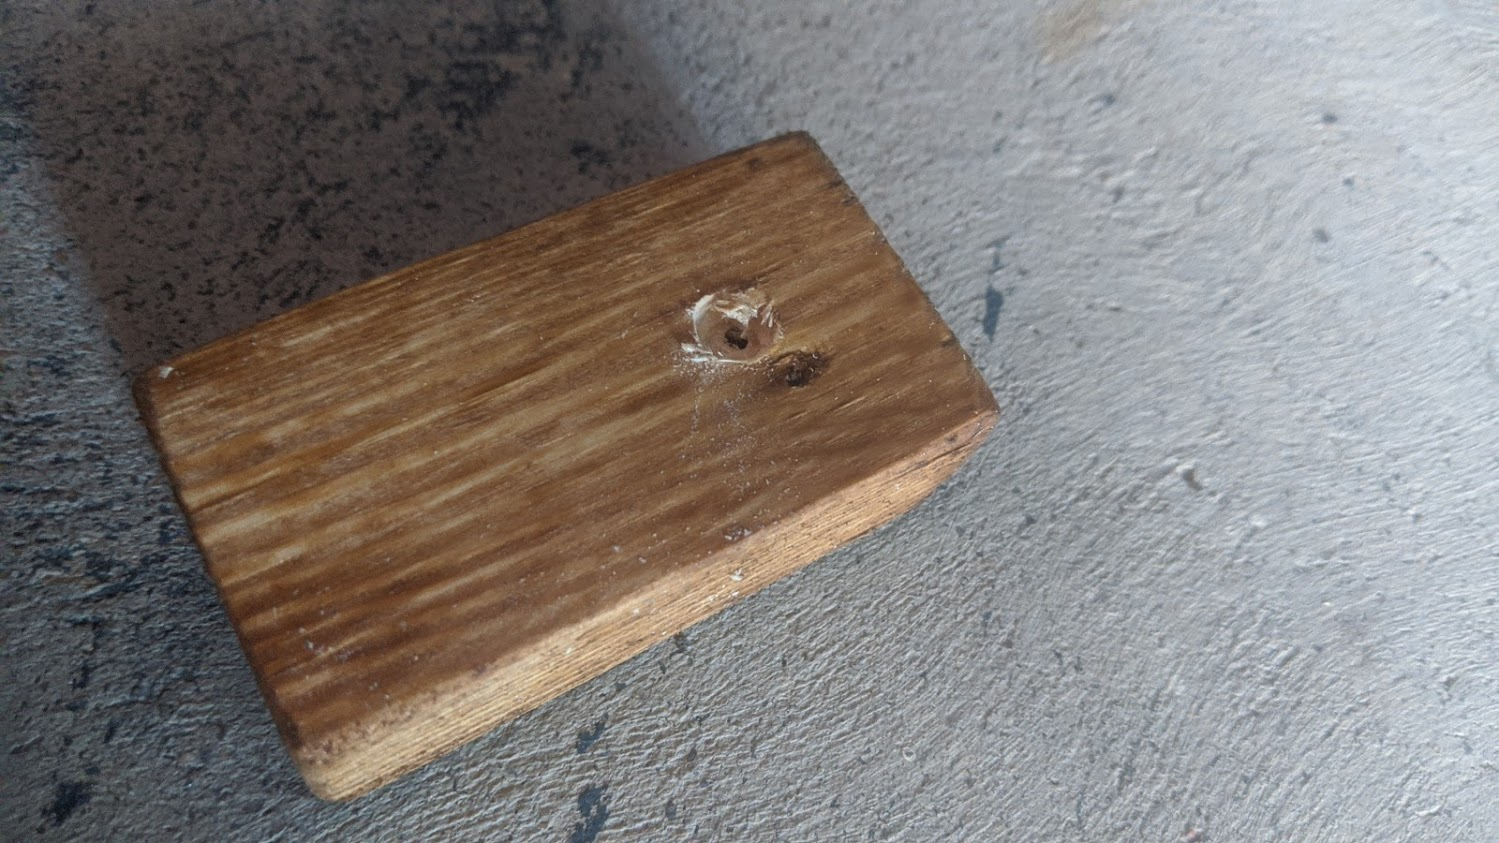
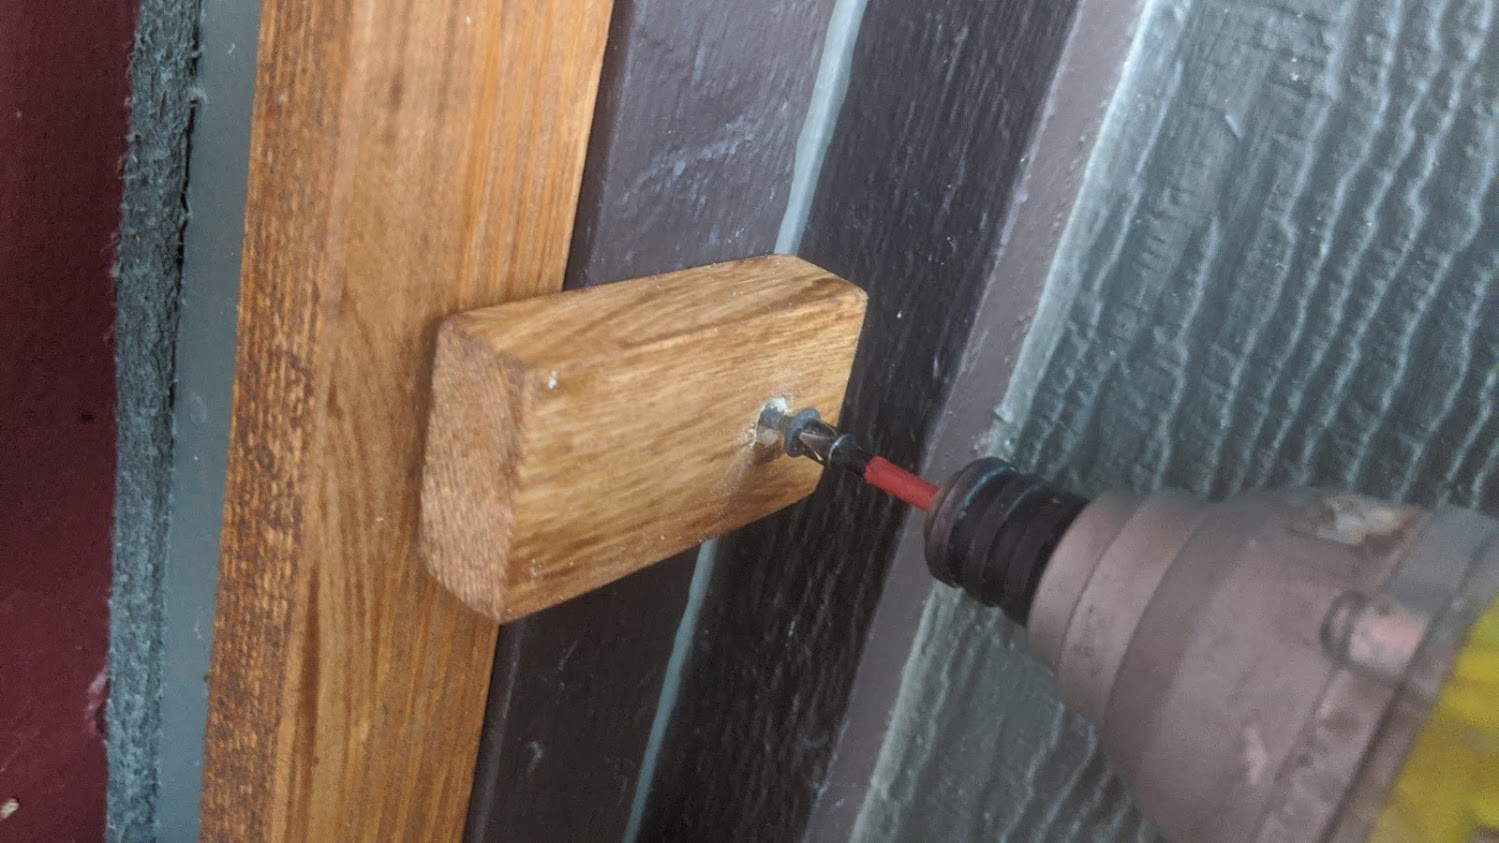
We cut 7 - 1.5" blocks off of the scrap 1x2" inch furring strips.
We measured in pre-drilled and countersunk the locations of our screw-in removable swivel brackets to their mounting location on the outside of the door frame.
We used a coarse thread 2" wood screw to drive the lock into the door frame on all four corners, approximately 8in from the top and bottom.
These blocks can now be simply swiveled out of the way and the entire screen can be removed with ease. The blocks can also be removed by simply pulling the four screws.
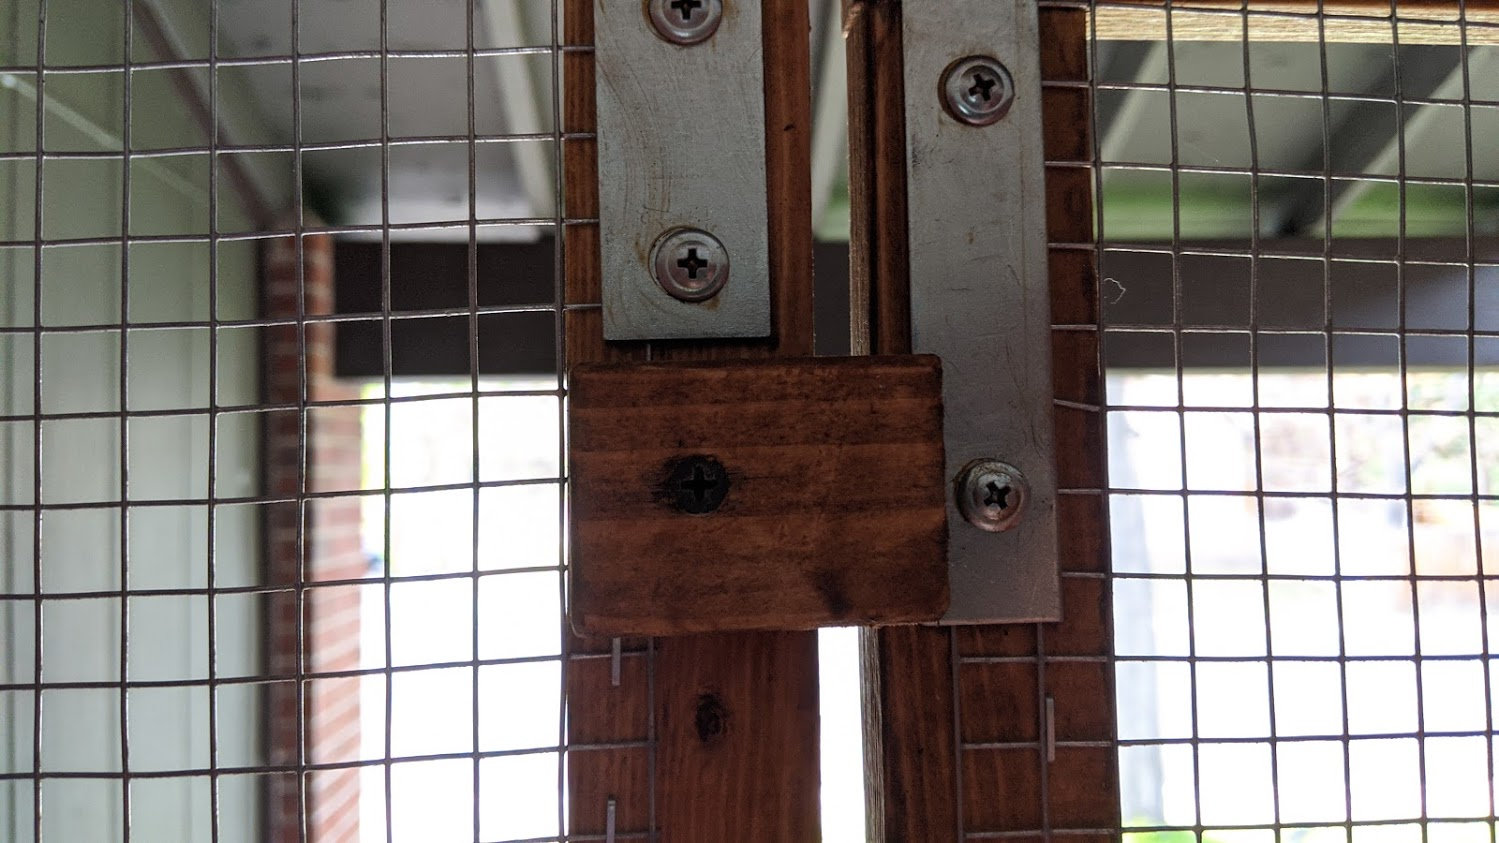
Take two more blocks and place them on the inside of the screen frame, ensuring they slightly overlap on the inside. We chose 4in from the top and 4 inches from the bottom. These blocks will act to stop the screen door I'm swinging back into the house.
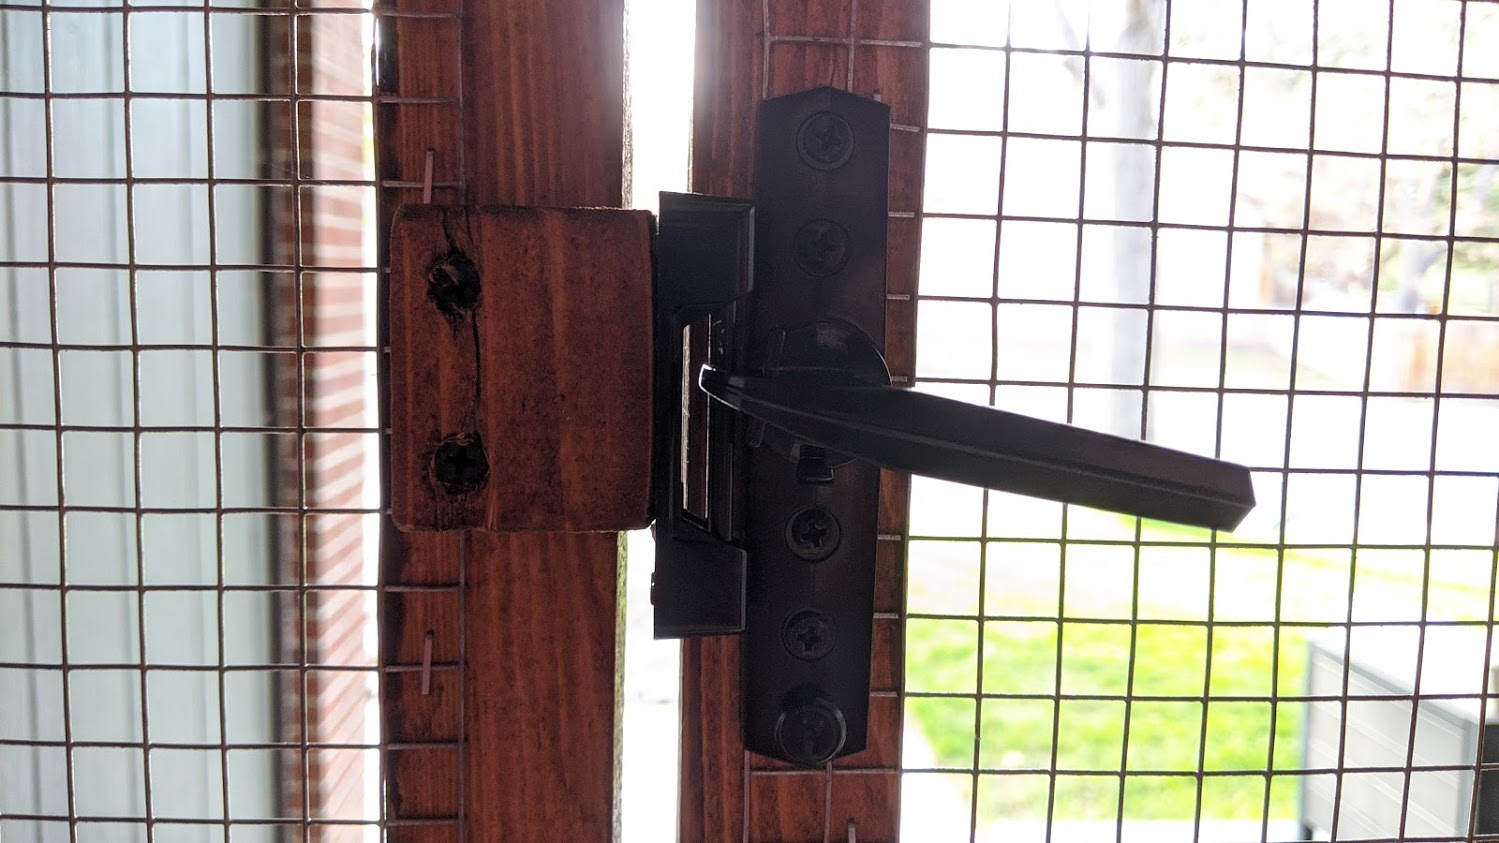
The last block was used as a mount for the screen door hardware. This should not protrude out and overlap the screen door unless your hardware requires this.
Attach your striker which is the receiving end of the door hardware on the fixed door frame check to ensure proper tension and adjust as needed.
Step 14: Use
Now go get your favorite beverage of choice open that front door along with the windows of your choosing or your back door and just like that you've increased the ventilation in your home which reduces viral transmission and viral load.